Basics to configure a CISCO router to connect to internet.
21st Apr 2010 | category: Wired Networks | Hits: 1280
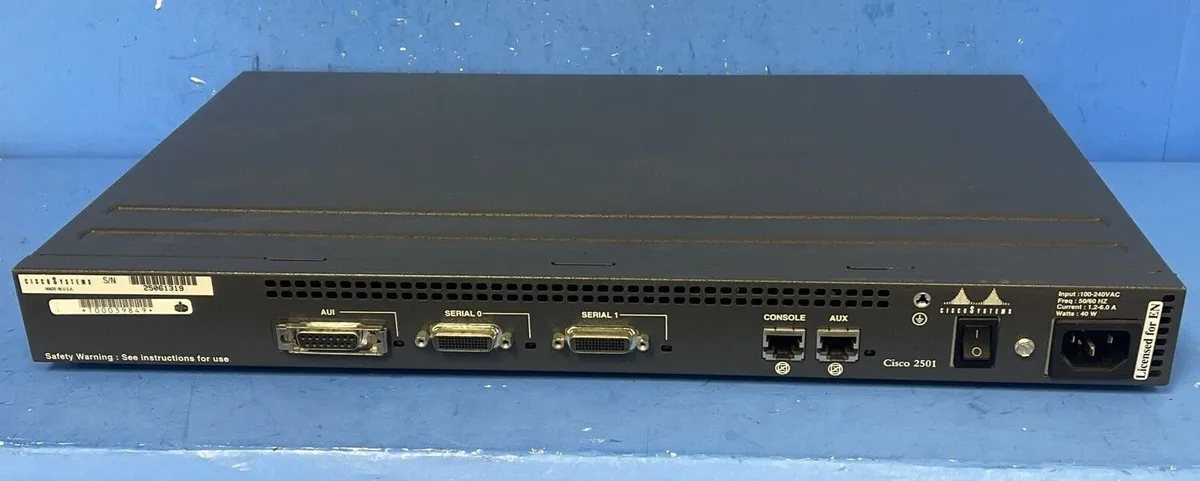
- 1. Router: Cisco 1600 series.
- 2. ISP Addresses: [IP Address: 192.168.23.11 SubMask: 255.255.255.0 Gateway: 192.168.23.1].
- 3. LAN Addresses: [IP Address: 10.100.10.1 SubnetMask: 255.255.255.0]
- 4. Console Cable.
Step 1
- - Connect your router into power and connect your console cable (will need an RJ-45 to DB-25 adapter). Power up that router without wasting a lot of time.
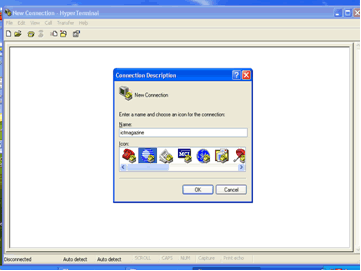
- - Open up your HyperTerminal: Start -> All Programs -> Accessories -> Communications ->
HyperTerminal
- You can name anything your “Connection Description” mine is “ictmagazine” and choose 2nd icon.
 HyperTerminal.
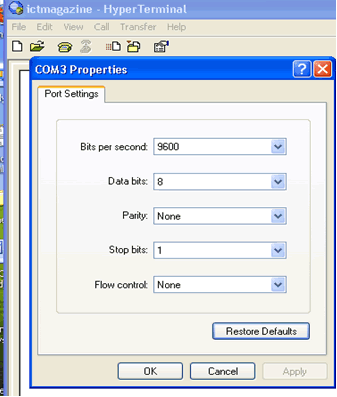
- - Press OK , Then on the next interface choose a “COM” port your console is connecting to from the router. Mine was COM3 then press OK.
- - On the next screen restore to defaults “Restore Defaults” and you should be having something similar to that below.
 Hyper Terminal
- Then pressOK. You should be in your router now.
- Well I will avoid you all the boring talk and just dive straight into the really thing “configuring a router to internet”, so let us go straight to step 2.
- Please note that the names and password have used those are as per on my router. You can use anything you prefer to make sure your configurations are secure and matching to your standards.
Step 2: Configure Basics
- Router>en
- Router# config t
- Router(config)# hostname ICT
- ICT(config)# enable password joinict
- ICT(config)# enable secret m@g@z1n3
- ICT(config)# ip name-server 208.67.222.222
Step 3: Configuring the Line console and vty 0 4
- ICT(config)# line console 0
- ICT(config-line)# password g3t1n
- ICT(config-line)# login
- ICT(config-line)# exit
- ICT(config)# line vty 0 4
- ICT(config-line)# password b0b0ut
- ICT(config-line)# login
- ICT(config-line)# exit
Step 4: setting up the LAN interface
- ICT(config)# interface Ethernet1/0
- ICT(config-if)# Description ICTMAGAZINE LAN
- ICT(config-if)# ip address 10.100.10.1 255.255.255.0
- ICT(config-if)# ip nat inside
- ICT(config-if)# no shutdown
- ICT(config-if)# exit
.Step 5: setting up the INTERNET interface (this interface has IP Addresses provided by Internet provider –ISP)
- ICT(config)# interface FastEthernet0/0
- ICT(config-if)# Description Broadband Internet
- ICT(config-if)# ip address 192.168.23.11 255.255.255.0
- ICT(config-if)# ip nat outside
- ICT(config-if)# no shutdown
- ICT(config-if)# exit
Step 6: Configuring NAT and Routing statements.
- ICT(config)# ip nat inside source list 1 interface FastEthernet0/0 overload
- ICT(config)# ip route 0.0.0.0 0.0.0.0 192.168.23.1
.Step 7: Configuring the Access-list 1 (This allows the LAN to get connection to the internet).
ICT(config)# access-list 1 permit 10.100.10.0 0.0.0.255
Step 8: Run show commands to confirm your configurations
- ICT(config)# show interface ethernet1/0 (verify the LAN IP configuration)
- ICT(config)# show interface fastethernet 0/0 (verify External/ISP IP configuration and status)
- ICT(config)# Show ip route (show your routing statement if its correct)
- ICT(config)# show ip nat translations (This is to confirm if your nat statements are right)
- ICT(config)# show access-lists (configured access lists)
Step 9: Save your router configurations
ICT(config)#wr
Pheeeeeeeewwwwwwwwwww………….atlast we are done! At this point you should be in position to access internet using your cisco router.
There is a lot you can do with your cisco router. Let me know what you want to do on your cisco router. We shall be glad to help you out. All the best guys am out of here to my next issue.
Related Posts
Cisco rolls out a new router CRS-3 "A monster gadget for NEXT GENERATION INTERNET"
Bluetooth Laser Virtual Keyboard
Dell's New 10.1inch Inspiron Duo is a true Convertible!
Xbox Live free games update: Microsoft makes HUGE Xbox games reveal
How to install Microsoft office picture manager in windows 10
Howto connect WhatsApp web on your Desktop or laptop
How to Change your IP address
Howto move Cpanel accounts from one remote server to another using command line.
Casio’s new G-SHOCK Smartwatch is powered by Wear OS from Google
How to Increase the Max Upload Size Limit
Adv